- Written on
- 8 min. reading time

Growkit contamination appears as green, black, or white fuzzy patches that signal bacterial or fungal invaders have taken hold in your mycelium. Green mould (Trichoderma) is the most common, appearing as fluffy greenish-white spots that turn darker green over time. Black mould forms dark, slimy patches, while cobweb mould grows fast as wispy grey-white strands. Once you spot contamination, quick action and proper disposal of affected material can sometimes save the kit, but severe contamination requires starting fresh.
What does green mould contamination look like?
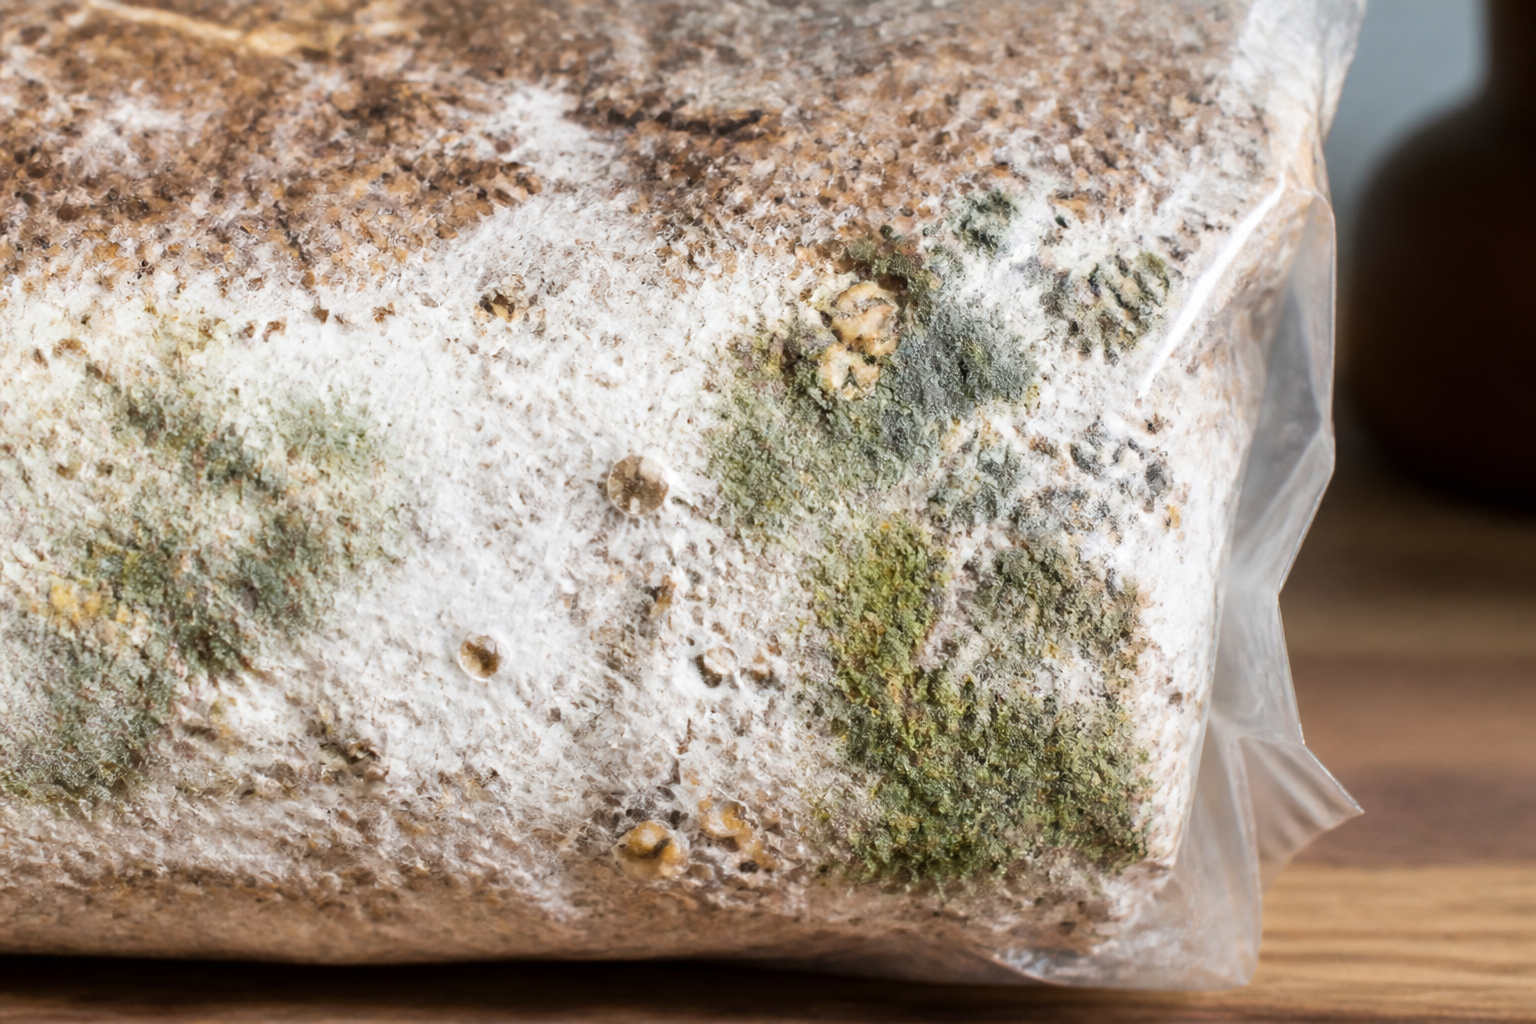
Green mould, scientifically known as Trichoderma, is the most frequent growkit contamination home growers encounter. It starts as small white or light green fluffy patches on the substrate surface, often confused with healthy mycelium at first glance. Within 24 to 48 hours, these patches darken to a distinctive olive or forest green colour, sometimes with white edges.
The texture is cottony and powdery. If you see green dust when you gently tap the kit, that’s Trichoderma releasing spores, a sign the contamination is advanced. Green mould spreads rapidly and releases enzymes that break down the substrate, competing aggressively with your mushroom mycelium for nutrients.
Common causes include non-sterile conditions during setup, contaminated water in the humidity tent, or poor air exchange. If caught early, when the patch is smaller than a coin, you may be able to isolate and remove it. Beyond that, the kit is typically unrecoverable.
How do you identify black mould in a mushroom growkit?
Black mould contamination appears as dark grey to jet-black slimy or fuzzy patches, often accompanied by a musty, unpleasant smell. Unlike healthy mycelium, which is bright white and fibrous, black mould looks wet and spreads in irregular shapes across the substrate.
Species like Aspergillus niger or Rhizopus are common culprits. Black mould thrives in overly wet conditions, so if your growkit has been over-misted or the humidity tent has pooled water, you’re at higher risk. The mould can colonise quickly and produces airborne spores that are harmful to breathe in large quantities.
If you notice black patches, do not open the growkit indoors without a mask. Move it to a well-ventilated area or outdoors, assess the extent, and if the contamination covers more than a small corner, dispose of the kit safely. Black mould contamination is aggressive and rarely worth trying to save.
What is cobweb mould and how does it differ from mycelium?
Cobweb mould is a fast-growing fungal contamination that looks like fine, wispy grey or white threads stretched across the substrate surface, resembling spider webs. It grows noticeably faster than mushroom mycelium, sometimes doubling in size overnight.
The key difference: healthy mycelium is dense, ropey, and bright white with a slightly fuzzy texture. Cobweb mould is thin, airy, and greyish, with individual strands visible to the naked eye. If you’re unsure, wait 12 hours. Cobweb mould will spread dramatically; mycelium grows steadily but slowly.
Cobweb mould thrives in stagnant, overly humid environments with poor fresh air exchange. It’s less common than green mould but can overtake a kit within days. Some growers attempt to treat early cobweb contamination by misting the affected area with 3% hydrogen peroxide, which can slow its spread. However, if the mould returns or covers a large area, the kit should be discarded.
What causes contamination in mushroom growkits?
Contamination happens when competing bacteria or fungi colonise your growkit before or faster than the mushroom mycelium. The most common causes include:
- Non-sterile setup: Touching the substrate with unwashed hands, using contaminated water, or opening the kit in a dusty room introduces spores and bacteria.
- Excess moisture: Over-misting or pooling water creates ideal conditions for mould. The substrate should be damp, not waterlogged.
- Poor air exchange: Stagnant air encourages anaerobic bacteria and cobweb mould. Fresh air exchange is critical, even in humidity tents.
- Temperature extremes: Growkits kept above 26°C or below 18°C stress the mycelium and favour contamination.
- Old or damaged substrate: Kits stored too long before activation or with visible cracks are vulnerable from the start.
Prevention is easier than recovery. Always wash your hands, use clean tap water or boiled and cooled water for misting, and follow the instructions in our growkit essentials guide closely.
Can you save a contaminated growkit?
It depends on the type and extent of the contamination. If you catch green or cobweb mould when it’s a small, isolated patch (smaller than a €1 coin), you may be able to remove it and continue. Here’s how:
- Isolate the kit: Move it away from other grows to prevent spore spread.
- Remove the contaminated area: Using a clean spoon or knife sterilised with boiling water or alcohol, scoop out the affected substrate plus a 2 cm margin around it. Dispose of it in a sealed bag.
- Improve conditions: Increase fresh air exchange, reduce misting frequency, and ensure the kit is at the right temperature (20-24°C for most strains).
- Monitor closely: If the contamination returns within 48 hours, the kit is lost.
For cobweb mould, some growers spray the area lightly with 3% hydrogen peroxide, which can kill the mould without harming mycelium. This is a last-resort measure and doesn’t always work.
If contamination is widespread, dark green or black, or accompanied by strong odours, do not attempt to save the kit. Dispose of it safely and start fresh with a new growkit from our range, applying stricter sterile technique from the beginning.
How do you prevent contamination in future flushes?
Prevention starts before you even open the growkit box. Follow these steps to minimise contamination risk:
- Work in a clean space: Wipe down your workspace with diluted bleach or alcohol. Avoid windy rooms, kitchens during cooking, or areas with pets.
- Wash your hands thoroughly: Use soap and water, then optionally spray with rubbing alcohol before handling the kit.
- Use clean water: Tap water is usually fine, but if your water quality is poor, boil and cool it first or use bottled water.
- Mist lightly, not heavily: The substrate needs surface moisture, not saturation. Two or three light mists twice daily is enough.
- Ensure airflow: Crack the humidity tent or bag slightly to allow fresh air in. Stagnant air is a contamination magnet.
- Maintain stable temperature: Keep your growkit between 20-24°C. Use a heat mat if your room is too cold, but never place it directly under the kit.
- Don’t touch the substrate: Your hands carry bacteria. If you must adjust the kit, use clean utensils.
If you’ve had contamination before, sterilise all reusable equipment like spray bottles and containers with boiling water or alcohol between uses. For detailed cultivation guidance, see our blog on when to pick mushrooms to maximise your harvest from clean flushes.
What should you do with a contaminated growkit?
If your growkit is beyond saving, dispose of it responsibly to prevent spores spreading to other grows or indoor spaces. Seal the entire kit, substrate and all, in a plastic bag and place it in your general waste bin. Do not compost contaminated substrate, as mould spores can survive and spread outdoors.
Before disposing, move the kit outdoors or to a bathroom with the door closed to limit spore release indoors. Wear a mask if the contamination is extensive or black. After disposal, wash your hands and any surfaces the kit touched with soapy water or disinfectant.
Take the experience as a learning opportunity. Review what went wrong: was it excess moisture, poor air exchange, unclean conditions, or temperature issues? Adjust your approach with the next kit. Many growers encounter contamination on their first or second attempt and go on to produce healthy, abundant flushes once they refine their technique.
Frequently asked questions
Can I still eat mushrooms from a growkit with contamination?
No. If contamination is present anywhere in the kit, do not consume any mushrooms from it, even those that look healthy. Moulds like Trichoderma and Aspergillus can produce mycotoxins harmful to humans. Safety first: discard the entire kit.
How can I tell if white fuzz is mycelium or mould?
Healthy mycelium is bright white, dense, and grows slowly in ropey strands. Cobweb mould is greyish, thin, wispy, and spreads rapidly overnight. If unsure, wait 12-24 hours and observe growth speed. Mycelium is patient; cobweb mould is aggressive.
Does spraying hydrogen peroxide really kill cobweb mould?
Spraying 3% hydrogen peroxide on early-stage cobweb mould can slow or stop it temporarily, as it oxidises the mould without harming mushroom mycelium. However, if the mould returns within a day or two, the contamination is systemic and the kit should be discarded.
Why does contamination happen more in the first flush?
The first flush is when the substrate is most vulnerable. The mycelium hasn’t fully colonised the surface, and you’re introducing moisture and fresh air for the first time, creating opportunities for airborne spores to land and grow. Subsequent flushes are usually cleaner if the first succeeds.
Can I reuse the growkit container after contamination?
Yes, but sterilise it thoroughly first. Wash with hot soapy water, then soak in a diluted bleach solution (1 part bleach to 10 parts water) for 10 minutes, rinse well, and air dry. This removes spores and bacteria, making the container safe for a fresh kit.
What’s the difference between bacterial and fungal contamination?
Bacterial contamination appears as slimy, wet, foul-smelling patches, often grey, yellow, or brown. Fungal contamination (mould) is fluffy, powdery, or webby, and less odorous initially. Both ruin the kit, but bacterial contamination usually smells worse and spreads faster in waterlogged conditions.
Final thoughts
Spotting growkit contamination early and knowing when to act or when to let go is part of the learning curve every home grower walks. Clean technique, proper humidity, and patience are your best defences. If your first kit fails, don’t be discouraged. Browse our full growkit range and start again with the lessons learned. Most successful growers have a contamination story or two behind them.